-
DHT11 wifi temp loggerESP2866 2016. 9. 19. 16:42
Arduino IDE esp8266 보드 및 라이브러리 추가
1.파일>환경설정>추가적인 보드메니저 URLS에
http://arduino.esp8266.com/stable/package_esp8266com_index.json 입력
2.툴>보드>보드메니저>
esp8266설치
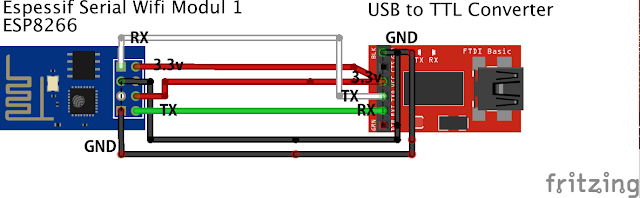
esp8266 PIN

자료 출처:http://blog.huntgang.com/wp-content/uploads/2015/01/module.jpg
스케지 업로드
스케치 업로드 시 GPIO 0는 gnd로 연결
작동중일 떄
data.sparkfun.com 데이터 저장
Public URL
http://data.sparkfun.com/streams/VGxW7Zl67Vu7N9R93lvv
Logging using query string parameters
Format:
http://data.sparkfun.com/input/[publicKey]?private_key=[privateKey]&humidity=[value]&temp=[value]
Example:
http://data.sparkfun.com/input/VGxW7Zl67Vu7N9R93lvv?private_key=9YdqJRw1JMIPA4g4D9dd&humidity=27.10&temp=1.74
If you would like to learn more about how to use data.sparkfun.com, please visit the documentation for more info.
<code>
/*
* This sketch sends data via HTTP GET requests to data.sparkfun.com service.
*
* You need to get streamId and privateKey at data.sparkfun.com and paste them
* below. Or just customize this script to talk to other HTTP servers.
*
*/
#include <ESP8266WiFi.h>
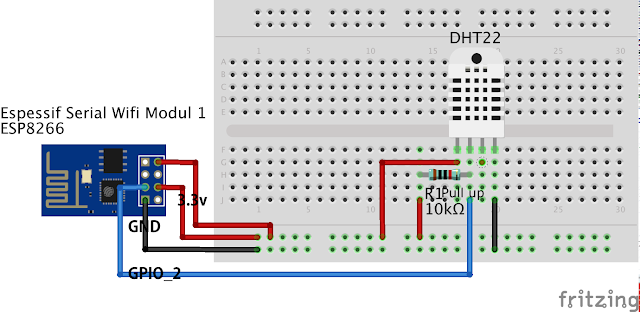
#include "DHT.h"
#define DHTPIN 2 // GPIO 2 pin of ESP8266
#define DHTTYPE DHT11 // DHT 22 (AM2302)
const char* ssid = "................";
const char* password = "................";
const char* host = "data.sparkfun.com";
const char* publicKey = "................";
const char* privateKey = "................";
DHT dht(DHTPIN, DHTTYPE,30); // 30 is for cpu clock of esp8266 80Mhz
void setup() {
Serial.begin(9600);
dht.begin();
delay(10);
// We start by connecting to a WiFi network
Serial.println();
Serial.println();
Serial.print("ESP8266 Connecting to ");
Serial.println(ssid);
WiFi.begin(ssid, password);
while (WiFi.status() != WL_CONNECTED) {
delay(500);
Serial.print(".");
}
Serial.println("");
Serial.println("WiFi connected");
Serial.println("IP address: ");
Serial.println(WiFi.localIP());
}
void loop() {
delay(5000);
// Reading temperature or humidity takes about 250 milliseconds!
// Sensor readings may also be up to 2 seconds 'old' (its a very slow sensor)
float h = dht.readHumidity();
// Read temperature as Celsius
float t = dht.readTemperature();
// Read temperature as Fahrenheit
float f = dht.readTemperature(true);
// Check if any reads failed and exit early (to try again).
if (isnan(h) || isnan(t) || isnan(f)) {
Serial.println("Failed to read from DHT sensor!");
return;
}
// Compute heat index
// Must send in temp in Fahrenheit!
float hi = dht.computeHeatIndex(f, h);
Serial.print("Humidity: ");
Serial.print(h);
Serial.print(" %\t");
Serial.print("Temperature: ");
Serial.print(t);
Serial.print(" *C ");
Serial.print(f);
Serial.print(" *F\t");
Serial.print("Heat index: ");
Serial.print(hi);
Serial.println(" *F");
Serial.print("connecting to ");
Serial.println(host);
// Use WiFiClient class to create TCP connections
WiFiClient client;
const int httpPort = 80;
if (!client.connect(host, httpPort)) {
Serial.println("connection failed");
return;
}
// We now create a URI for the request
String url = "/input/";
url += publicKey;
url += "?private_key=";
url += privateKey;
url += "&temp=";
url += f;
url += "&hum=";
url += h;
url += "&hidx=";
url += hi;
Serial.print("Requesting URL: ");
Serial.println(url);
// This will send the request to the server
client.print(String("GET ") + url + " HTTP/1.1\r\n" +
"Host: " + host + "\r\n" +
"Connection: close\r\n\r\n");
delay(10);
// Read all the lines of the reply from server and print them to Serial
while(client.available()){
String line = client.readStringUntil('\r');
Serial.print(line);
}
Serial.println();
Serial.println("closing connection");
delay(600000); // Send data every 10 minutes
}
- See more at: http://www.esp8266.com/viewtopic.php?f=11&t=3569#sthash.7sUolBp4.dpuf
자료 출처
'ESP2866' 카테고리의 다른 글
ESP8266 핀배열 (0) 2016.09.25 ESP8266 Firmware Update with FTDI (0) 2016.07.02